Sunday, March 4, 2012

Back to Bloggin'

Long time, no blog. Where have I been??? I'm sure some of you are wondering and others have just forgotten about the blog, I have not stopped cooking that is definitely still a passion and hobby for me. Unfortunately, photography and writing are not. So I will try my hardest to get back to it on a much more regular basis. 

Blah, Blah, Blah...

Let's get this thing going!!!!

While out and about in Berkeley one day we ran across a yard sale where I picked up a new cookbook. I love getting used cookbooks because I like to see the recipes that were dogeared by the original owner. I've even gotten one that was flagged with post-it notes that said things like "yummy" and "Must Try". The weather here is always so nice there are yard sales everywhere all the time. I probably stop by one at least every two weeks where I always check for cookbooks:)

This recipe comes from 

THE PHILOSOPHER'S KITCHEN : Recipes from Ancient Greece and Rome for the Modern Cook


Etruscan Focaccia

Ingredients:

1 package dry yeast 
2 tablespoons honey
2 cups all purpose flour (and a bit more for dusting your work surface)
5 tablespoons extra virgin olive oil
2 tablespoons salt 
Cornmeal for dusting the pan
1 tablespoon fresh chopped rosemary 
1 tablespoon course sea salt 

Directions:

Mix the yeast, honey and one cup of warm water into a small bowl until the yeast dissolves.
In a large bowl, combine the flour, 2 tablespoons of the oil, and the salt. Slowly add in the yeast mixture, a little at a time, combine with fork or electric mixer.
Lightly flour your hands and work surface, and knead the dough.
Add more flour or water to keep the dough from sticking.
Knead for 5 minutes.
Place dough in lightly greased bowl, poke it a few times with a knife and cover and allow it to rise in warm dry place for about and hour.
Knead the dough again and divide in half. (this recipe makes 2 loaves)
Take each half and make into a rectangle about 4-5 inches by 8-10 inches.
Place rectangles on cornmeal dusted baking sheet.
Mix rosemary with the one tablespoon of remaining oil, spread over focaccia and press the herbs in with your fingers. (I added golden raisins to one of the loaves it was nice)


Heat oven to 500º
Bake until golden brown about 15 minutes.
Drizzle with the last tablespoon of oil and sprinkle with coarse salt.

I must say it was pretty tasty!! Nothing like Perbacco's Focaccia in San Francisco but it was homemade and that makes it delicious to me. It was served as a side item to the amazing Buffalo Meat Chili I made when Matthew had a few dudes over one night.


OK! On to the next recipe. :)


 Pan Seared Salmon with Potato, Leek and Mushroom Hash with Dill and Gorgonzola

This recipe turned into our breakfast the next morning. Read further to find out how :)

Ingredients:

2 filets of Salmon
3 tablespoons extra virgin olive oil
2 potatoes cubed
2 leeks washed and chopped 
2 cups fresh wild mushrooms roughly chopped
2 cloves garlic minced
5 tablespoons dried dill
1 ounce crumbled gorgonzola cheese

Salmon Directions:
So I have a seared salmon recipe that has previously been posted. I prepared this salmon close to that same way. The only difference was this time I used olive oil for the searing. Click here for the directions on preparation.

Hash Directions: 
Add 2 tablespoons of oil to cast iron skillet heat to med high.  Add potatoes and cook for about 8 minutes do not cook all the way through. Add leeks and cook until those begin to soften about 5-7 more minutes. Once potatoes and leeks are almost cooked add mushrooms and garlic. Cook for another few minutes until mushrooms are cooked and garlic is becoming fragrant. Remove from heat. Sprinkle with dill and gorgonzola cheese. Salt and pepper to taste. Plate and serve.


Now remember just a moment ago when I said we had this for breakfast the next day???? 
Remember a while back when I made "The Egg Thing"????

For some strange reason Matthew and I did not clean our plates this particular evening and there were some leftovers, about half a filet of Salmon and maybe two cups or so of the hash.

I made "THE EGG THING", omitted the cheese and Rosemary Ham and added the leftovers instead. It was AWESOME!!! I felt a little like Sandra Lee having a "round two recipe". LOL

The Egg Thing Round Two


 Alright my friends. That is it for now :) I promise I will be back on a more regular posting schedule and I also promise I will find the scone recipe I mentioned I would share with you a million years ago.

I Lacy do solemnly swear to blog regularly :)
Monday, October 24, 2011

Ode to Cream Cheese

My Mom tells me a story of when I was around age three she found me sitting in the floor in front of the refrigerator eating cream cheese straight from the container with a spoon. I think that may have been the defining moment in my life when my love for cream cheese was made known. Ha! The following recipes are an homage to one of my favorite things, CREAM CHEESE.


The first recipe stems from a dish that I love back home in Nashville.
Sunset Grill's Nachos. That is by far the best thing they serve and only served on the late night menu....sorry Sunset Grill, but yes these Nachos are really all you have to offer. The nachos are topped with something an insider once told me is referred to as "SWILL". (Swill is some sort of strange cream cheese concoction, kind of like nacho cheese but not at all) Then the nachos are completed with the normal nacho type items. Chicken, jalapenos, black beans, sour cream and tomatoes. I must say whatever "SWILL" is, I'm hooked.
I have been looking for something to satisfy my Sunset Grill Nacho craving for a long time.


Eenie's Chicken Enchies 
The following recipe is a collaboration between the husband and myself in an attempt to re-create the nachos from Sunset. It was his idea to turn them into enchiladas.
However, the name of the recipe is for the person who loves them the most and probably makes these enchiladas once a week, at the least. LOL


INGREDIENTS : 

6 Flour Tortillas
2 Large Chicken Breast 
1 Can Black Beans, rinsed
1 Can Corn, rinsed
1 Package Cream Cheese, softened
1 Red Bell Pepper, chopped
1/2 Onion, chopped 
1 Jalapeno, chopped (you may use the entire Jalapeno or half depending on your love for spice)
1/2 cup shredded Mexican cheese (we love Jack)
1 Can Green Chilies
2 Tablespoons Cumin
2 Tablespoons Garlic Powder
Salt and Pepper

FIX'NS :
Lettuce 
Tomato 
Sour Cream 
Avocado
Hot Sauce

RECIPE : 

Coat Chicken Breast with the Cumin, Garlic, Salt and Pepper 
Grill until cooked through
Allow chicken to rest and cool 
Place chicken in large plastic bowl
Using two forks Shred the chicken

Add all other ingredients to the bowl of shredded chicken, mix thoroughly.


Sorry for the poor pictures but with it getting darker earlier the lighting in my kitchen is low.


Fill tortillas with the filling, roll up and place seem side down in a glass casserole dish.
Top with can of green chilies and a little more shredded cheese
Heat oven to 375º Bake for 15-20 minutes. Top with Fixings of your liking :)

 
Yeah, it's that simple. And I must say pretty close to the flavor I was looking for, only fresher.

Also, do not worry if you did not use all the filling it can keep in the fridge for 4 days and in the freezer for a month.
You can reheat the filling and use it to top tortilla chips. 
You can roll them in corn tortillas and fry to make flautas.
You can place in a pan in between two tortillas to make a quesadilla. 
It is a very tasty and versatile filling that goes a long way. Try it tonight!

And now for dessert!


Avocado Cheesecake 
Okay guys this recipe is a twist on one of my most favorite (and terrible for you) things. My Mother's cheesecake. Which I used to request for my home Birthdays as a kid. This recipe is the epitome of the Southern "Cooking" as there is no cooking. This recipe only requires you to open a can, a block of CREAM CHEESE and do a little measuring. This style of "cooking" also reminds me of Sandra Lee on the Food Network. She opens a lot of cans ;) My recipe is made using the addition of Avocado and Raspberry Sauce. I think my Mom would love it :)


INGREDIENTS: 

2 Large Ripe Avocados
1 Graham Cracker Crust 
1 Block Cream Cheese, Softened
1 Can Eagle Brand Sweetened Condensed Milk 
1/8 Teaspoon Vanilla Extract 
1/4  Cup Realemon Brand Lemon Juice (or whatever you can find I just remember this bottle always being in our fridge)

RECIPE : 
In food processor pulse Avocado until very silky smooth.
Add all ingredients to a bowl and Blend with mixer until very smooth. 
Pour into Graham Crust place in fridge for 8 hours until "set"

Raspberry Sauce :
2 Cups Fresh Raspberries, Smashed 
2 Cups Sugar 
1 Cup Water 
Splash of Vanilla Extract

Place all ingredients into small sauce pot
Simmer for about 50 minutes until significantly reduced

Drizzle over slices of dessert ;)


 The verdict is in and this version of the cheesecake is sooooooooooo Good!!!!!!!!!!

The avocado adds a cool mildness to the acidity of the lemon juice and makes it a bit less sweet and extra smooth. You can really get the avocado flavor on the end of the taste. And well we all know that raspberry sauce could make anything good. I'm addicted. I've had three slices :)


Rosemary Raisin Bread

This weekend I made my first attempt at baking bread. It was a bit more difficult than I had planned on it being, but i did power through and I did wind up with a loaf. 

Am I thrilled with the way it turned out? NO. Am I going to try again? YES!

There was something about kneading the dough I loved. And watching it rise was like a science experiment I found fun. I will be a bread baker!!!!! :)

I am not going to post a recipe but I will post some pics. Once the recipe has been perfected I will share it with you. 

I am open to suggestion from any bread bakers out there.

I preferred it toasted.

I did toast the bread and slather it in butter and liked it more. Which proves that butter makes everything better. However, I want the bread to be good alone without toasting and without butter.
So I will work until bread making is mastered. LOL
  
Over the past couple of weekends...

We rode our bikes down to the beach, watched the Blue Angels from a little spot on the Bay, did some cooking :) went to brunch and out for sushi dinner, we went to a party in the Presidio, Matthew got some sweet new shoes and we saw a pony at the grocery store. 
But the biggest news of all is that my little sister (25 years little) had a baby.  
CONGRATULATIONS AMY!!!!!! 
HAPPY BIRTHDAY LILYANNA!!!!!!! 
Matthew and I are so happy to be an Aunt and an Uncle again :)
She is just PERFECT!!!!

At Ocean Beach. I love this pic of him ;)
Speeding through Golden Gate Park
Blue Angel...Can you see it????
This is a mini pony in a mini van :)
My orchid garden is doing really well. I have over 8 unbloomed buds :)
Kobe beef burgers topped with cheese and homemade heirloom pepper relish. You should try it. So tasty.
Cool Mural.

The End.

Thursday, October 6, 2011

3 in 1

Hello Everyone!!!! I'm pretty sure you may have thought I abandoned Blog. LOL 
Whew!!!! I had no idea that Blogging was almost like having a second job :)
Since I have neglected to Blog for many weeks now I will give you 3 recipes in 1 Blog post. 
Enjoy Friends! Thanks for the understanding :)


By popular demand I will post the meal from last night first. I posted a pic of this meal last night on Facebook and have had several "Likes". I hope you love this simple recipe as much as we did.

 Recipe # 1
Roasted Whole Chicken Legs with Fava Bean and Tomato Quinoa

Ingredients 

2 Whole Chicken Legs 
3 cups Cooked  Quinoa 
4 ounces Fava Beans 
I buy fresh if you need to know how to prepare 
20 Heirloom Cherry Tomatoes 
Handfull of Fresh Arugula
1/2 Shallot, Chopped
2 cloves Chopped Garlic 
1 tbsp. Olive Oil 
About 5 tbsp. Butter
2 tbsp. Garlic Powder 
Salt and Pepper 

Recipe

For the Chicken.....
Preheat oven to 375º
Rinse Chicken and pat dry Do Not Remove the Skin
Season Legs generously with Salt, Pepper and Garlic Powder
Take a couple of tbsp. of butter and coat the chicken covering the outside as well as placing some butter under the skin. It's a little messy but will be soooooo tasty ;)
Add a little more salt pepper and garlic powder 
Place legs on cookie sheet and roast at 375º for about 35-40 minutes or until chicken is cooked through. (This cook time also depends on the amount of chicken you are preparing)
Half way through the cooking process baste the chicken with some of the juices that have dripped onto the sheet. This will keep it moist and crisp the skin.

For the Quinoa....
While the chicken is roasting cook your Quinoa 
Place small nonstick pan over medium heat 
Add 1 tbsp. of the butter and the olive oil
Add Chopped Shallot and Chopped Garlic saute until translucent and fragrant
Add Fava beans and saute for 5 more minutes
Add this mixture to hot cooked Quinoa 
Add Arugula and Tomatoes 
Fluff with Fork

Now it's time to eat. The chicken skin was sooo great it was crispy and salty like a potato chip and the fresh veggies in the Quinoa  added a really nice balance. :)


Recipe # 2
"The Egg Thing"
 I know, I know it sounds so weird but I was cooking brunch for 5 people and had to come up with an easy way to cook a lot of eggs at once so I didn't turn into a short order cook :) So when my guests complimented the meal they referred to it as the egg thing. So now this recipe is called just that.


 Ingredients

10 Eggs
1 cup milk
2 tbsp. Butter (one tbsp melted)
1 cup shredded cheese of your choosing. I used a cheddar gruyere blend (Trader Joe's). It was delish.
1 package Trader Joe's Rosemary Ham (its lunchmeat )
In order to obtain this very unique flavor you must have this type of Ham but if not regular ham will work.


Recipe


Preheat oven to 350º

With the non melted tbsp of butter grease a glass baking dish
Beat eggs and milk together
Add melted butter, beat once more
Pour egg mixture into dish
Chop Ham and distribute through the eggs
Take 1/2 cup of the shredded cheese and do the same
Reserve 1/2 of shredded cheese
Bake 35 minutes or until eggs have "Set up"

Switch oven to BROIL
Sprinkle remaining cheese over top place under broiler until melted and top has browned. About 5-7 minutes.
Remove and sprinkle with Dill or Parsley for garnish.

You may eat this dish cold or hot. It is perfect for brunch.The ham is the best part you must try it.

I served up "The Egg Thing" with some homemade blueberry and walnut scones (I'll save that recipe for you on another day, but I will toot my own horn and say our British friend said they were the best scones he had ever had )  homefries and fresh chopped pineapple.


Complete with Coffee and Mimosas  :)


Recipe #3
Pan Seared Salmon with Deconstructed Brussell Sprout Mix 

This recipe is super quick I was done in about 25 minutes and the total cost for everything was $13. 49.

Ingredients

2 pieces Salmon (We got lucky the Sushi Grade was on special....to die for.)
3 Pieces Applewood Smoked Bacon
20 Fresh Brussell Sprouts 
3 ounces roasted butternut squash cut into slices or cubes (I bought this premade in the prepared food section.)
1 tbsp. Olive Oil
Salt and Pepper

 Recipe

For the Sprouts...
Cook bacon in large skillet until crisp.
Remove bacon and reserve 2 tbsp. of the bacon fat/grease rendered from the meat.
Chop Bacon and set aside
Chop Brussell Sprouts by removing the core and pulling the leaves apart
in the same pan you cooked the bacon add the chopped sprouts 
Saute until well wilted
Add Bacon bits and squash saute until heated through

For the Salmon...
Rinse filets and pat dry 
VERY LIGHTLY Salt and Pepper the Fish
On Medium-High, Heat non stick skillet
Add 2 tbsp of reserved Bacon Grease
Add Salmon Sear on each side for about 5 minutes

Yes .That meal is REALLY just that easy, it was soooooo Yummy. Cooking the Salmon in that small amount of Bacon fat adds a great element without overpowering the meal.

I hope you Enjoy. Cheers Friends!

Sunday, September 11, 2011

Garlic Butter Shrimp with Summer Quinoa

WooooooHooooooo!!!!!
Finally another post sorry to have kept you guys waiting so long.
 This was a rough recipe week for me. I tried and failed on something I was expecting to knock your socks off with, but hey nobody's perfect :) Also some of the ingredients this week will be a little different as I was unable to make it to a local farmer's market....Sorry Farmers and Foodies. Most of my grocery items this week were purchased from Trader Joe's. Not too bad, Right?

Needless to say a super simple recipe swept in at the last minute this week and now we will have a post!!!!!!

Garlic Butter shrimp with Summer Quinoa


This recipe could no be any more simple and I was able to feed five adults with this dish.

RECIPE : 

Shrimp
12-15 Frozen Jumbo Peeled Raw Shrimp (thawed) 
**this amount depends on how many you are feeding
4 tablespoons butter melted 
2 cloves garlic, minced

Quinoa
1 box qunioa 
**Again, amount depends on the number eating. But don't worry it refrigerates extremely well and is delish cold.
**Prepared as instructed on box. If the box directions say to use water, use chicken broth instead. Much tastier :)
8 oz. fresh sugar snap peas
1/2 chopped red bell pepper
15-20 fresh cherry tomatoes, cut in half 
Pinch of tarragon (optional)
1 chopped green onion, for garnish


Use mixed tomatoes for color
Chop all veggies, except sugar snaps

Place Sugar snaps in a microwave safe container 

add a tablespoon of water, steam in microwave for 40 seconds

In the meantime cook your Quinoa 
Quinoa in chicken broth before cooking

I have this lovely little microwave device from Pampered Chef. 
It is amazing for cooking rice and quinoa in 10 minutes:) 

But the stove top directions will be listed on your quinoa box if you do not have one of these handy little items.


Now its time to get those shrimp started.

Place minced garlic in bowl, add butter 

microwave for 10-15 seconds

Heat pan for shrimp

Make sure pan is really hot so the shrimp will turn golden.

Add Shrimp to pan, Baste shrimp with butter garlic mixture. 
Go ahead be generous butter is always so tasty :)  Continue to baste throughout cooking.
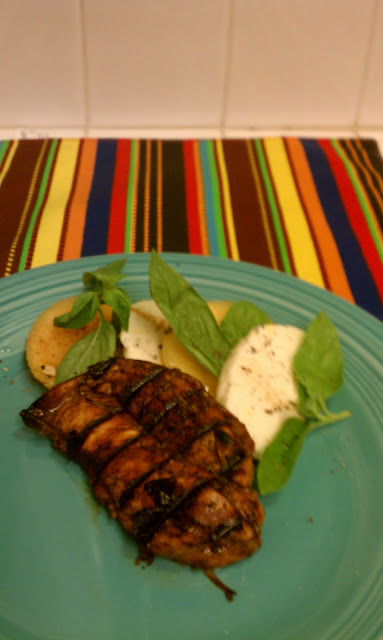


While shrimp are cooking finish up the quinoa
Once the quinoa has soaked in all the liquid, fluff with a fork

Add quinoa and chopped veggies to  a mixing bowl

Season with salt and pepper add tarragon if desired 

Again, fluff with fork


Once shrimp are opaque and brown on the outside remove from pan

Distribute quinoa onto serving platter add cooked shrimp on top and sprinkle with green onion.

Serve it up.......:)

Look at that yummy garlic butter crust on the outside of those shrimp!!!!


Enjoy Friends!!!!!! 

PS This weekend I was also able to whip up an amazing Brunch complete with Mimosas!!! I will share the recipe with you later this week in hopes that you will try it yourself this coming weekend. Cheers!


Thursday, August 25, 2011

Orchid Melon "Caprese" Salad with Balsamic Grilled Chicken

Oh middle of the week....

This week has been very busy. With friends in town, jury duty and deadlines at work I was worried I may not have a middle of the week post but I made it!!!!! A quick and simple dinner for 5 people on a Wednesday night!!!! I'm delighted.

Orchid Melon "Caprese" Salad with Balsamic Grilled Chicken


I must say there is nothing better than having an outdoor grill. But for those of you who are small apartment dwellers such as myself a kitchen must have is a cast iron stove top grill/griddle. 
If you don't know, now you know :)


Man, I love this thing. We make so many great items on it and they all have that great grilled flavor and those pretty little grill marks.


Now on to the recipe :)


Chicken Marinade Recipe :

Boneless Skinless Chicken Breast (however many will feed your family I was feeding 5 so this was the perfect amount of marinade)
1 cup Balsamic Vinegar
2 Tbsp. Worscheschire Sauce 
2 Tbsp. Honey 
2 cloves garlic 
1 lemon quartered
1 stem rosemary

Mix all ingredients together (don't worry keep mixing the honey will dissolve) 
place in a plastic container, bowl or plastic zip lock bag
Add chicken, cover and let marinate in the fridge for at least 30 min.


Next for the salad.....my favorite.
You may be wondering about the Orchid Melon. I had no idea what they were either but leave it to a trip to the farmer's market to teach me something new. The orchid melon is a tiny little heirloom watermelon and it is delish! Please buy this melon if it is available to you, but if not a regular mini seedless watermelon would certainly do the trick.

Salad Recipe:                                                              

1 orchid melon
1 bunch fresh basil 
8 ounces fresh mozzarella
2 cups balsamic vinegar                              

Look at how juicy this baby is.
Now for the fun part!!!! The construction of the salad. I thought it was a clever method. I was attempting a new take on an old salad so the point was to turn this melon into "tomatoes"

Cut melon into.  As shown in the picture above.
Try and slice the melon into 10 slices (again I was feeding 5)  Use a toothpick to remove some of the seeds. 

Now let's turn this melon into some "tomatoes"!!!! You will need one mid sized drinking glass. You will use the glass to cut out circles from the melon slices.


I found this part of preparing the meal to be fun. So if you have kids this step may be the one for them.

While the kids are cutting the melon, remove chicken from marinade sprinkle with salt and pepper and place chicken on grill sprayed with non-stick cooking spray. Grill chicken 5-6 minutes per side depending on the size of the chicken.

Bring the 2 cups of balsamic to a simmer let it reduce by half.
PADRON PEPPERS!
Look at those grill marks! I love cast iron.
OOOOOOOooooooooooOOOOOOOOOOOOO I forgot we ate these!!!!!!!!! These little padron peppers make a great appetizer. Put a tiny bit of oil in a pan, blister them and sprinkle with a bit of sea salt. They are not hot and have the best flavor. Mmmmmmmm just like Spain. Or so I hear ;)

Remove basil leaves from stems and slice the mozzarella to match the size of the melon circles.

Begin constructing the salad, I think the fan method I used is nice but you can also stack them for a nice presentation. Get creative with it!!! Drizzle balsamic reduction over salad. (be gentle you are already having balsamic chicken, too)

At this point your chicken should be cooked and rested. Plate it up and eat it up!!!!!!!


Yummy Yummy Yummy
We all made it as members of the clean plate club!!!!!!


Our friends from out of town.
 Matthew (the hubs) David from Britain, Jen and Ben from Asheville, NC ;)

I hope you find this a simple easy meal to make for your family or guests any night of the week.

Bye for now!!!!!!!

Sunday, August 21, 2011

Lavender Salt Seared Scallops with Sweet Pea Puree and Pancetta

I made this meal night before last and posted to Facebook. There were so many "likes" and comments that I wanted to let you in on the recipe. The best part about this meal is that the total cost with a bottle of wine was around $17 for 2 people in a restaurant it would have cost around $22 for one scallop entree without the wine.
Another great score from the San Francisco Farmer's Market  is Eatwell Farms Lavender Salt. It is so dang delicious I eat it sprinkled on buttered bread. You can also make a body scrub from it. I imagine that if you do not have access to this brand you could incorporate some dried lavender into some course sea salt for a similar flavor. It adds a richness and depth to the dish that I cannot describe.


Lavender Salt Seared Scallops with Sweet Pea Puree and Pancetta

RECIPE :
8 Jumbo scallops rinsed and patted dry ( more or less depending on the size of your family)
1/2 cup finely chopped shallots
3 tbs extra-virgin olive oil
1 tsp minced garlic (I love my garlic press)
2 cups frozen peas
1 cup chicken broth
Lavender salt and fresh ground black pepper  
5 thin slices pancetta
1/3 cup chopped fresh salad greens
1-1/2 tsp. grated lemon zest
1 tbs butter

Preheat Oven to 375º 

Set aside 1 tbs. of the shallots and put the rest in a saucepan with 2 tbs. of the oil and the garlic
Cook over medium-low heat until the shallots are soft, about 5 minutes.
Add the peas and the broth and season with a pinch of salt and pepper.
Bring to a simmer over medium-high heat and then reduce the heat to medium low.
Cover the pan and cook about 5-8 min.
Pour the pea mixture in blender and puree until smooth.
Season to taste with salt and pepper.
Return the puree to the saucepan, cover, and set aside to keep warm.


Put the pancetta on a baking sheet and bake until golden brown and crisp, 10 to 14 minutes.


Gremolata : In a small bowl combine the salad greens, lemon zest, and the 1 tbs. shallots you set aside earlier and set aside.
Chopped shallot, lemon zest and garlic.


Fresh salad greens from Happy Boy Farms. I love them because they add  little edible flowers to the mix that make it so pretty. The people at their stand are always sooooo nice, too.


Pat the scallops dry and season them generously with lavender salt and pepper.


Heat the butter and the remaining 1 Tbs. oil in the very best non-stick skillet you have over medium-high heat until very hot. 


Add the scallops and cook, flipping once, until golden brown on both sides about 2 to 4 minutes per side. Place on plate with paper towel.

Seared scallops with crumbled baked pancetta.


*** Green Note : Matthew and me stopped using paper towels a long time ago so the scallops are on a linen. Think about it less waste, less $$$$. Ahhh, Semi Green Living :)


Place the scallops on the puree and crumble the pancetta on top. Sprinkle the Gremolata on top.

Let's look at it again. It's just so pretty!!! The flavor is something I can never explain. (that is why I'm not a writer) DELICIOUS! The End.


Enjoy!!!!!!